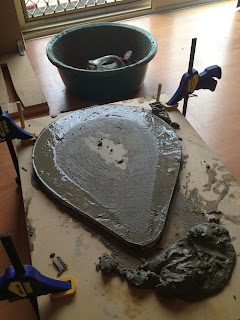
I started to play around with some concrete and molds pretty quickly, just trying to find out what i could/couldn't do.
I mad up some reo, but it didn't really do anything
The concrete was so brittle it feel to pieces as i was i removing the mold
It was clear that I needed to seal the wood before pouring, so the moisture doesn't get absorbed by the wood.
I changed concrete mix and started to use a quick dry mix of sand and cement. This was a much cleaner smoother finish than the other stuff, so i kept using this stuff.
Using the toaster to bend some acrylic
The bent acrylic drops into holes in the concrete, locking it into position so the motor turns the turntable.
2 different approaches at locking the concrete pulley and turn table together
Photo's of the first physical model, just to get my head around the actual dimensions and forces on what is going on
Balancing the tone arm. I used 2 metal brackets & slid them forwards and back, to leave a weight of 3grams resting on where the needle would be.
I did up a quick SolidWorks model of what i was thinking early on. I was still very unsure of how it was going to work, but the idea's were there.
My original tech Pack, with cartridge, motor, power supply, AV cables and the spindle.
I decided i would mount the motor on a swing arm, which would pivot into another, larger wheel using a spring, and turn the turn table using direct drive, rather than a pulley/belt system.
The 3 photos above are showing my first working model. Very rough and has no resemblance the design i was heading towards, but it worked and gave me confidence i could actually make this thing.
Knocked up a quick wooden model of the shape i was going for
I cast some concrete onto the base of the platter, to use as the larger wheel. The concrete was too thin, and crumbled around the edges, so i decide i couldn't use concrete here, because that is where the force of the motor wheel is pressing.
My model with the concrete & acrylic platter.
Now that i new what shape i wanted, i started to make the mold for the concrete.
It has to be able to come apart without breaking to mold, as to reuse it again and again.
I used MDF for the outside frame and the middle insert, and some sheet metal to create the outside surface
.
I sanded the middle insert down smooth, and on and angle of 3 degrees so it would slide out of the ser cast concrete much easier than if it was flat sided.
The only problem i could see with this method, was that i would have some sort of seem line down the back, as it would be hard to cover over it.
I used wood primer to seal the MDF, and i coated the mold with standard engine oil as the release agent, because that wouldn't mix with the concrete in the mold.
The first attempt worked ok, but i made the concrete to thick and struggled to get it into all the mold.
Its still the exact size and shape that i need, so it serves and a perfect prototype for the final record player.
I started inserting all the components and for this model, replaced acrylic with plywood for obvious financial reasons.
I got my acrylic, and had it laser cut using Adobe Illustrator files i had created.
Everything fits together nicely, and it looks like all the planing is paying off for being so accurate
.
It all works under the platter, now i just have to concentrate on getting a good concrete shape, and the tone arm
I made this one much runnier, and was able to vibrate as many air bubble out as i could.
After a couple of days, i got the concrete out of the mold and dropped into a sink of water to let it cure slowly and avoid cracking in any dry hot days.
Everything is wired up and working, i'm just waiting on the concrete for the tone arm counterweight to dry and it will be finished.
I had a variably resistor to back the speed down to 33 & 1/3 RPM, but I somehow managed to burn it out the nigh before it was due, so it is currently running at about 38-39 RPM.
It still works, just everything is sped up a bit....
FINAL PHOTO'S & VIDEO
Front on
Platter side
Low perspective hero shot
Mechanics
In Playing position
FINAL PHOTO'S & VIDEO
Front on
Platter side
Low perspective hero shot
Mechanics
In Playing position


